The Complete Guide: How to Onboard Locum Tenens
Onboarding can mean many things, depending on the type of provider joining your staff, the size and complexity of the organization, and the work the individual will be doing at your site. In this article, we’ll break down how to onboard locum tenens providers at your facility.
A locum provider who comes to your facility for a few weeks or months will have many similar needs to a new permanent employee, but there will also be key differences in onboarding and orientation requirements. Set yourself up for success with locum providers by preparing to integrate them into your healthcare facility with efficiency and speed. Doing so can help them to acclimate to the facility faster, have a better experience overall, and incentivize them to keep coming back! A successful onboarding experience will allow for a smooth introduction to staff, systems, and even to the local culture and community.
Onboarding or Orientation?
To be sure we’re on the same page, we should begin by clarifying the difference between “onboarding” and “orientation.” Basically, onboarding encompasses a series of events that enable new employees/locum staff to learn what they need to do to meet the responsibilities of their positions. Orientation refers to the initial welcome a company provides to new staff, usually done the first day on site.
Onboarding includes interactions with the new provider from the point of agreeing to assignment dates all the way through their integration with your clinic staff and culture. Orientation is a smaller piece of that whole process.
Much of the work of onboarding can be done in advance. Whether you’re experienced at bringing locum staff into your facility or find yourself responsible for this task and are wondering where to start, this guide will offer suggestions you can adapt to your needs.
Identify What You’ll Need to Onboard Locum Tenens
A Quick Note About Credentialing:
Once you’ve approved a provider (new to your site) to work, the process of credentialing will begin. Credentialing can take weeks or even months, giving you plenty of time to prep the various elements of your onboarding plan.
The first step in creating a well-organized and comprehensive strategy for integrating a new provider is identifying the various components of onboarding (this will be in addition to credentialing requirements for the provider’s professional role at your site). These are key areas:
- Administrative: Organizational requirements to meet your facility’s policy and procedure. This can include items such as completing employee health screening, acknowledgement of privacy practices, facility safety training, fit testing, etc.
- Clinical Processes and Information: Complete training on your facility’s electronic health record and equipment and processes unique to your site. This would include items such as education for the process to transport patients, orientation to the system for making referrals, and learning need-to-know details about taking call and managing patient issues.
- Logistical & Community Information: This section of the onboarding plan is the practical guide for someone new to your area to prep them for a successful stay in your community and work experience in your facility. This could include information on cultural traditions the provider should be aware of; climate/ weather knowledge; special events that will occur during the provider’s stay; workplace expectations/traditions, and anything that would create a positive and welcoming experience.
Larger facilities are likely to have a more robust onboarding/orientation process and will allow time for that in advance of beginning the clinic schedule. Smaller clinics may have a very basic handoff between an outgoing and incoming locum provider and/or local staff. Larger organizations may carve out multiple days for onboarding while small facilities may have a very simple, short process. But whether your site is large or small, some process is essential. For facilities of any size, providing proper EMR training is essential, as it’s one of the areas our providers most frequently comment about wishing they had more training on how to use the programs.
Regardless of size, you can create an organized and detailed plan that will provide the parameters and expectations critical to success.
Once you identify what you’ll need to onboard a provider, you’ll want to put together your onboarding documentation, which will include an orientation schedule.
How We Help:
At Wilderness Medical Staffing, we do as much as possible to prepare a locum provider new to your facility, obtaining and sharing expectations for call, clinic schedule, and key contacts at the site with the provider. We also confirm logistics: all travel, lodging, vehicle, and any requirements that must be completed in advance of arrival and beginning the assignment (some of these logistics WMS may arrange, some the local clinic staff may arrange). We collect and provide this basic information to providers, but you can supplement with greater detail in your onboarding plan, as some particulars may not be ironed out until shortly before the provider arrives (who is picking up, what vehicle they’ll have, etc.)
If you’re working with a different locum tenens staffing agency, they may assist with different aspects, as not all companies approach getting providers to assignments the same way.
Create an Onboarding Documentation Packet Using a Template
The simplest way to plan for onboarding is to create an Onboarding Documentation Packet for the items that you’ll have the provider complete or review. You may want to set up a template that you can edit and revise with date changes or other simple updates.
In a medical facility, you might want to create an onboarding template that works for the type of role: medical providers have one template, nursing staff have another, non-medical staff have another, etc. Though there will be some onboarding requirements common for all staff regardless of professional role or licensure, some requirements will be based on the individual’s position.
What to Include in Your Onboarding Documentation Packet
 Your new locum tenens provider will likely have a lot of questions (and a bit of stress) before starting an assignment with you. Much of the information you include will be regarding preparing for an assignment, not necessarily the assignment itself.
Communicating ahead of time can help to make sure you’ve done your due diligence to prepare the provider and will likely ease their nerves. Sending them an email with the following information can be an easy way to explain more about how your provider needs to prepare. Be sure to also print out a copy for them upon arrival.
DOWNLOAD THIS FREE TEMPLATE TO GET STARTED
Here’s what you’ll want to include in your Onboarding Documentation Packet:
Contact Information
Contact Numbers
- List the primary contacts for the provider for clinical and non-clinical needs and their mobile numbers. If primary contacts are on leave during the provider’s assignment, identify backup contacts.
- A staff directory with up-to-date names, titles, and contact info.
- Contact information for back-up support. Even if a provider is working at a solo site, there will be providers at the next level of care to provide phone or video call support.
As you’re creating the onboarding/orientation schedule and documents, check phone numbers and any detail that may have become out of date since the documents were last edited. Nothing is more frustrating than realizing the information you’ve been given to navigate a new site is unreliable. Worse, presenting new staff with incorrect information reflects poorly on the professional environment and triggers a lack of trust.
Information Regarding Travel
Be sure to list the date and time of arrival. Are there any travel details that would be helpful to spell out, such as navigating between a hub airport and the location of a smaller regional airport or ferry terminal?
In addition, will someone meet the provider, or will they be picking up a vehicle, etc. and navigating to the facility or lodging on their own?
Include helpful insights for clothing geared to the climate and any information that they should know when packing. Describe grocery availability if they need to bring food with them, if you’re located in a remote area. Are there baggage/weight limitations they should be aware of? What type of resources are in your community for entertainment/recreation. Are family and pets welcome to come with them? Etc.
Quick points to include:
- Date/time of arrival
- Relevant travel details
- Clothing suggestions
- Grocery availability
- Baggage weight limitations
- Community resources
- Family/pet rules
Information Regarding Housing/Lodging
 If you know where the provider will be staying, include details of the housing. Is there a full kitchen, washer/dryer, one bedroom, or more? Is the lodging private or a shared arrangement?
When WMS arranges an assignment, we can often obtain this information upfront. But sometimes housing is not determined until shortly before the start date, so it’s helpful for the latest information to be included with the pre-arrival email.
Provide instructions for vehicle pick up and lodging access: color, make, model, and tag number for the vehicle. Also include vehicle and lodging keys, access codes, and any details that are essential, especially if they arrive after business hours when assistance may not be as readily available.
Provide information for the lodging such as WiFi network and password, instructions for electronics or anything unique to the lodging, and contact information for maintenance or support.
Quick Points to Include:
- Housing details
- Housing access
- Vehicle pickup
- WiFi information
- Contact info for maintenance
In-Person Handoff Items:
- Keys for housing and vehicle (given after arrival)
Additional helpful information:
Include links to websites that would be useful, a digital map, and anything else that will make the new provider’s planning thorough. Include an overview of the culture of the community and historical information that would be helpful.
Include the Orientation Schedule for the first day in clinic, with directions to the location, entrance, who their contact for orientation will be, and where they’ll meet.
Quick Points to Include:
- Useful website links
- Digital map
- Community/cultural Overview
- Orientation Schedule
Create an Orientation Schedule
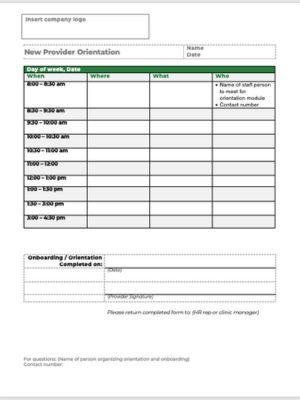 Include in your Onboarding Documentation Packet an Orientation Schedule for the first day your provider is on site.
- Begin with a tour of the facility and an introduction to the staff.
- Identify key individuals the provider will be working with by name, role, and location. The provider should have key contacts for clinical staff, support staff, and administration. These will be their “go-to” people for problems or questions.
- Review the timeline for completing training/orientation. Some sites have online modules to complete to be fully onboarded. Be sure the provider understands if there are items that need to be checked off online, or in person with staff (for example, fit testing or safety modules).
- Review expectations for lunch, breaks, and general facility culture.
- Identify and schedule time for orientation for each department: pharmacy, lab, imaging, clinic, emergency/call, etc.
- Allow time for IT set up (if IT can set up email access, electronic health record access, etc. in advance that will be helpful).
- Arrange for the new provider to obtain a key card or building access; access to secure areas such as pharmacy or health information; and the opportunity to secure an ID badge/facility ID.
We’ve included this template as a model you can use to create your own Orientation Schedule. DOWNLOAD IT HERE.
Gather Additional Documentation
Along with the Orientation Schedule, share key information that the provider can keep at their desk and/or on their phone or laptop so they can find/review answers to many of the questions that will arise during their stay. Include:
Guides
- Trouble-shooting guides for electronic access and after-hours instructions for IT support.
Scheduling Information
- Workflow/instructions for seeing patients during regular hours and after hours/on weekends. This is especially important if there’s little or no support staff when the provider is on call.
Patient Transport Information
- Workflow/instructions for arranging patient transports. This is most critical if the provider is working in a solo site without local support staff who know whom to call and all the variables that may impact the transfer of patients to a higher level of care, such as commercial carrier schedules, regional resources, airlift services for the region, etc. It’s good to have all that detail available for the provider even if there is local support. You never know who will be available in an emergency, and it’s always best to have as much information as possible to make good decisions.
Next Steps
 Once you prepare the Onboarding Documentation and Orientation Schedule (include the orientation day as part of the whole Onboarding Document), send that to the provider in advance via email.
Also, send the schedule to the person who will be facilitating orientation when the provider arrives for their first day at your facility. Be sure the staff member tasked with orienting the new provider is aware of this responsibility, has a good understanding of their role, and is someone who will be welcoming and a good representative of your organization. First impressions are lasting impressions!
Your facility’s onboarding process is the first encounter a new provider will have with your administration and clinical staff. This is an opportunity to make a good impression and set the positive tone that you want. While the provider’s main job is to see patients, the foundation you create through onboarding will go a long way toward establishing synergy and potential for return assignments, and that’s a win for everyone.
The suggestions and examples of information to provide for onboarding/orientation are general, and you may have other topics to cover. This tool, once developed, can be easily maintained for current information, and edited to fit the position of new people joining your staff.
Items to Exclude from Your Onboarding Documentation
What items are you not including for the onboarding of locum providers? That would be anything that would pertain to a new employee, such as enrollment in health insurance plans, retirement plans, direct deposit setup, etc. Typically, you wouldn’t need to “enroll” a locum provider in any continuing service offered to employees.
Beyond the first day of orientation, your onboarding process may continue if you allow for an extended time to complete online modules or in-person check-offs. If your HR department requires that the orientation schedule be checked off as completed, be sure to turn in any signed documentation.
Wrapping Up
It will be helpful to your HR and/or clinic staff to be very consistent with the format and requirements for onboarding and orientation. Consistency will allow staff who are responsible for the various components to get comfortable with their tasks and be welcoming representatives for your facility.
The more you can do to create an orderly onboarding process and work out issues, questions, and keep your information regularly updated, the greater sense incoming providers will have that you’re organized and on target. You will help your facility’s reputation for excellence and efficiency with this approach, and that’s a great intangible side benefit that makes this process even more worthwhile.
At WMS, our goal is to see the locum providers we send on assignment have a great experience while offering excellent care. Getting them started with all the information they need helps assure a successful assignment for the provider and facility, and we’re always happy to do anything we can to support both providers and local staff in working together.